Your Ultimate Guide: How to Edit Photos In Lightroom Classic
Hey there Shutterbug, just wanted to let you know that some of the links on this site may be Amazon Affiliate or affiliate links,. which means I may earn a small commission if you make a purchase after clicking on them. But don't worry, it won't cost you any extra – in fact, sometimes you may even get a special discount! So if you do decide to buy something through my links, know that you'll be supporting my work and helping me bring more helpful content your way. Thank you for your support, you're like a superhero to my work! I couldn't do it without you, unless I suddenly develop the ability to clone myself...which, honestly, would be pretty cool.
Taking photos is only half the battle. The other half is how to edit photos to perfection. With the proper editing techniques, you can transform an average photo into a masterpiece. In this post, we’ll introduce you to the essential editing tools and techniques, such as cropping, exposure adjustment, and colour correction, that will take your photos from good to great.
Hey there, photography enthusiasts and curious minds! Ever wondered how to transform your ordinary photos into jaw-dropping masterpieces? Look no further, because in this guide, I’ll be spilling the beans on the captivating world of photo editing. Whether you’re a newbie eager to embark on your photographic journey or a seasoned snapper aiming to refine your skills, I’ve got your back!
In today’s digital age, photo editing isn’t just a bonus – it’s a game-changer. We’ll dive into why tweaking your snapshots can take your photography to the next level. From enhancing colors to adjusting lighting and beyond, I’ll be unraveling the magic of essential editing tools and techniques that can turn an average shot into a visual masterpiece that’ll leave jaws dropping.
Why Photo Editing is Important
Before we dive into the nitty-gritty of photo editing, let’s take a moment to appreciate its importance. You see, capturing a great photo is just the first step. Photo editing allows you to enhance the colors, adjust the exposure, and fine-tune every little detail to make your images pop. It’s like putting the final polish on a masterpiece, turning a good photo into an extraordinary one. Plus, it gives you the freedom to express your unique style and vision, truly making each photo your own.
But don’t worry, you don’t need a fancy degree in graphic design to edit photos like a pro! Lightroom Classic, Adobe’s powerful editing software, is here to save the day. With its user-friendly interface and intuitive tools, you’ll be editing like a pro in no time.
Photo Editing Program: Lightroom Classic
In the vast landscape of photo editing software, both free and paid options offer a plethora of tools to transform your images. From Adobe Photoshop to Capture One, GIMP to Pixlr, each software brings its unique set of features to the table. While the techniques shared in this guide apply broadly across various programs, I personally gravitate toward Lightroom Classic for its exceptional organizational capabilities and non-destructive editing approach.
Why Lightroom Classic, you ask? Well, it goes beyond mere editing. Lightroom Classic acts as a hub for managing, sorting, and retrieving your photos effortlessly. With the ability to swiftly add metadata like keywords, titles, and captions, Lightroom Classic transforms your editing space into an organized archive that’s easy to navigate. And here’s the icing on the cake – your edits are safely stored in a separate file, preserving your original image intact.
While Lightroom Mobile offers a similar editing experience and a distinct set of AI presets, it lacks the robust organizational component that makes Classic a powerhouse for heavy lifting. So, for those main edits and streamlined organization, Lightroom Classic is the trusty companion you’ve been searching for
Workflow, Do You Need One?
Alrighty, let’s chat about workflows – you know, that nifty roadmap to keep you on track while you’re diving into the world of photo editing. A workflow is like having a trusty GPS for your creative journey. It helps you stay organized, efficient, and focused, making the whole “how to edit photos” process a breeze.
Let’s break it down into an easy-to-follow list for your photo editing adventure in Lightroom Classic:
- Import: Get started by importing your awesome shots and organizing them into neat folders.
- Edit Dance: Time to boogie with your editing skills! Adjust exposure, colours, and sharpness to make your photos shine.
- Crop and Straighten: Give your pics that polished look by cropping and straightening them like a pro.
- Presets Magic (optional): Sprinkle a touch of enchantment using presets – these clever shortcuts have undergone exciting advancements in recent years. They seamlessly enhance your editing process, complementing manual adjustments to achieve that perfect touch. It’s like adding a pinch of wizardry to your creative mix, helping you craft stunning edits with finesse.
- Fine-Tuning Zone: If there’s anything you’re not vibing with in the presets, fear not! You can always swing by the manual panels to make those personalized tweaks and perfect your photo just the way you want. It’s like being the conductor of your own editing orchestra – every adjustment, note, and tweak harmonizing to create your masterpiece.
- Export Brilliance: Wrap it up by exporting your masterpiece in your preferred format. Ta-da! You’ve mastered a snazzy editing workflow.
In a nutshell, a workflow is your secret weapon to streamline the “how to edit photos” mission. It keeps you organized, guides your creative process, and helps you achieve stunning results in no time. So, let’s embrace the art of workflow magic in more detail and turn our photo edits into pure awesomeness!
READ MORE>> How to Take a Photo: Picture Perfect in 14 Steps
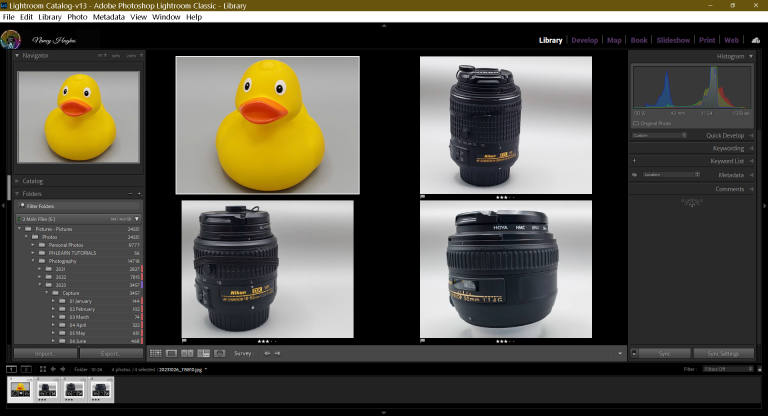
Getting Started with Photo Editing: Import
Let’s dissect the process of importing photos into Lightroom Classic, breaking it down into easy-to-follow, snack-sized steps:
- Open Lightroom Classic: Launch the Lightroom Classic app on your computer. It’s like stepping into your creative playground!
- Connect Your Device: Plug in your camera, phone, or insert your memory card into your computer. Lightroom Classic needs to know where your photos are.
- Click on ‘Import’: Look for the ‘Import’ button at the bottom of the screen. Click on it – it’s like opening the door to your photo adventure.
- Select Source: Choose where your photos are coming from. This could be your device, a memory card, or a specific folder on your computer.
- Preview Your Shots: Your photos will appear as thumbnails. Take a peek to make sure you’re importing the right ones.
- Choose What to Import: Click on the photos you want to work with. You can select all or just a few – it’s your call.
- Decide on Destination: Pick where you want your photos to go. Create a new folder or select an existing one – your virtual photo album.
- Apply Presets (Optional): If you have presets, you can add a dash of style to your photos before they even land in your collection.
- Add Keywords (Optional): Tag your photos with keywords to help you find them easily later. It’s like giving them a digital label.
- Hit ‘Import’: Ready to go? Click the ‘Import’ button, and Lightroom Classic will work its magic, bringing your selected photos into your world.
- Enjoy Your Edits: Now you’re all set to explore, edit, and transform your photos using the amazing tools Lightroom Classic has to offer. Have fun, and let your creativity flow!
Sort the Good Photos from the Bad
Before anything else sorting the gems from the duds in your photo collection is a crucial step in your journey of mastering how to edit photos. Using flags and stars to rate your photos in Lightroom Classic can be a game-changer. Here’s a step-by-step breakdown of how to do it, keeping things as simple as catching a breeze:
- The Rating Options: Lightroom Classic offers three rating options: 3 flags, 5 stars, and 5 colors. This leads to endless combinations of rating your photos. But let’s not dive into the deep end of complexity. We’re going for straightforward magic here. Trust me I have done and re-done my system a few times.
- Go to Library Module: Head over to the ‘Library’ module – your virtual command center for managing and organizing photos. You will want to start in Grid view so press ‘g’
- Filter out the Duds: You will see the library filter at the top and you want to choose attribute. As you go through the steps you will adjust the photos you want to show. For now make sure everything is unselected except the ‘pick’ flag.
- Blow Up The Photo for Inspection: From here you will press either ‘f’ for full screen view or ‘e’ for loupe view. Try out each option for what you prefer but working with one photo at a time here is best to start. If you want to get back to all your photos showing hit ‘g’.
- Start with Flags: As you scroll through your photos, hit the ‘x’ key to reject the terrible ones – you know, the blurry or wonky-faced shots that deserve a swift boot. This should be quick as they will be fairly obvious.
- Caps Lock Speed Boost: Toggle on Caps Lock and choose a rating – Lightroom Classic zips to the next photo, making your rating marathon a breeze.
- Quick Picks with ‘p’: Press ‘p’ to put a pick flag on the rest to keep the screen moving– these are the potential winners, the ones that caught your eye even if they’re not perfect yet.
- Refine Your Picks: Now comes the fun part. Go back and switch some pick flags to reject for photos that are close but just miss the mark for composition or other reasons.
- Maybe 1-Star: Yet another pass through of your photos you will now put 1 stars or even 2 stars (to do this press ‘1’ or ‘2’ if your confident for the semi finalist. This can even be done in combination with the above step once you get some practise. Before moving on don’t forget to change the filter to choose not only the ‘pick’ flag but also the 1 star and ensure the math symbols beside it show greater than or equal.
- Gleaming 3-Star: Reserve those golden 3 stars for your unique shots, the ones that tell your story and are primed for editing and data adding. Of course to do this you can press ‘3’.
- Save Hard Drive Space: Before moving onto editing it is time to delete the rejects. They are for sure duds and no need to take up space on your hard drive. If you change the filters to show just the reject flags and no stars you will now just see your awful photos. Make sure to be in grid view and click on one photo, then ‘ctrl’ or ‘cmd’ + ‘a’, then press ‘delete’. You will get a popup and want to choose “Delete From Disk” to put them in your trash bin, unless you don’t, just choose “Remove from Lightroom” and it will just take them out of Lightroom but still be in your folders.
And there you have it! A simple, headache-free approach to sorting your photos like a pro. With flags and stars, you’ll swiftly separate the dazzling winners from the ‘meh’ contenders, setting the stage for your editing journey. Don’t be afraid to adjust this for your own circumstances but I can’t stress enough to keep it simple.
Metadata: Keep Yourself Organized From the Start
Next let’s talk about the world of metadata and how it can keep your photo library shipshape right from the beginning. Here’s a simple step-by-step breakdown of adding metadata in Lightroom Classic:
- Select Your Photos: In Lightroom Classic, filter your top photos you want to add metadata to. It’s like gathering all your treasures in one place.
- Go to Library Module: Stay in the ‘Library’ module – remember it’s your virtual command center for managing and organizing photos.
- Add Keywords: Click the box in the ‘Keyword’ panel. Think of keywords as little labels for your photos. Type in words that describe what’s in the picture – it could be ‘sunset’, ‘beach’, or ‘smiling faces’. Generally this will be category type words.
- Find the Metadata Panel: Look for the ‘Metadata’ panel on the right side of the screen and choose the ‘location’ option from the drop down. It’s like your control panel for adding those important details.
- Include Location: If your photos were taken in a cool spot like Peggy’s Cove or a charming Windermere street, add the location. It’s like putting a pin on your digital map.
- Title and Caption: Give your photo a catchy title and a short description (caption). It’s like telling a mini-story about your snapshot. Think the 5 W’s, who, what, where, when, why, and how and maybe a few adjectives.
Now, why is all this important? Think of metadata as the secret sauce to finding your photos later. When you’re wondering, “Where’s that awesome beach sunset pic?”, a quick search using keywords or location will have you swimming in options. Starting right away means you won’t have to play detective with your pics in the future. So, embrace the metadata magic and watch your photo collection become a breeze to navigate! I promise you it’s worth it. Be as detailed as possible but as simple as possible, a lesson you may have to learn on your own.
Essential Photo Editing Techniques
Finally what you came for, to the heart of photo wizardry: basic photo editing techniques in Lightroom Classic. Buckle up as we navigate this creative journey with a simple step-by-step roadmap:


- Start with the Basics Panel: As you enter the ‘Develop’ module, you’ll spot the Basics panel – your gateway to enchanting edits. On the right hand side of your screen.
- Setting the Stage with Profiles: Begin by experimenting with different profiles. This panel is actually on the left hand side. These set the tone for your photo and can create a unique mood right from the start.
- Balance that White: Tweak the White Balance to capture the perfect color temperature. If you’re unsure, try the ‘Auto’ setting for a quick fix.
- Mastering Exposure: Adjust the Exposure slider to control the brightness of your image. Bring out the details and add that ‘wow’ factor.
- Playing with Contrast: Boost Contrast to make your photo pop, giving it depth and dimension.
- Fine-Tune Highlights and Shadows: Juggle Highlights and Shadows sliders to find the ideal balance of light and dark. You can also play with the black and white sliders. The former is for the more subtle midtones and the latter is for overall and more dramatic.
- Texture and Clarity Charm: Enhance texture for a tactile feel, and increase Clarity for an overall sharpness boost. Be careful here as this may introduce grain to your photos which is a bad thing if you are selling these or printing them. Of course exception to the rule is if you are going for that look, but there is more advanced ways to do that.
- Magical Dehaze: Add a touch of Dehaze to remove unwanted haziness and reveal hidden beauty.
- Color Vibrance and Saturation: Infuse life into your photo with a dash of Vibrance for natural color enhancement. Use Saturation cautiously to avoid turning things into a rainbow explosion. Like the light blance sliders, these work in the midtones and overall. For subtle changes use vibrance and dramatic changes use saturation.
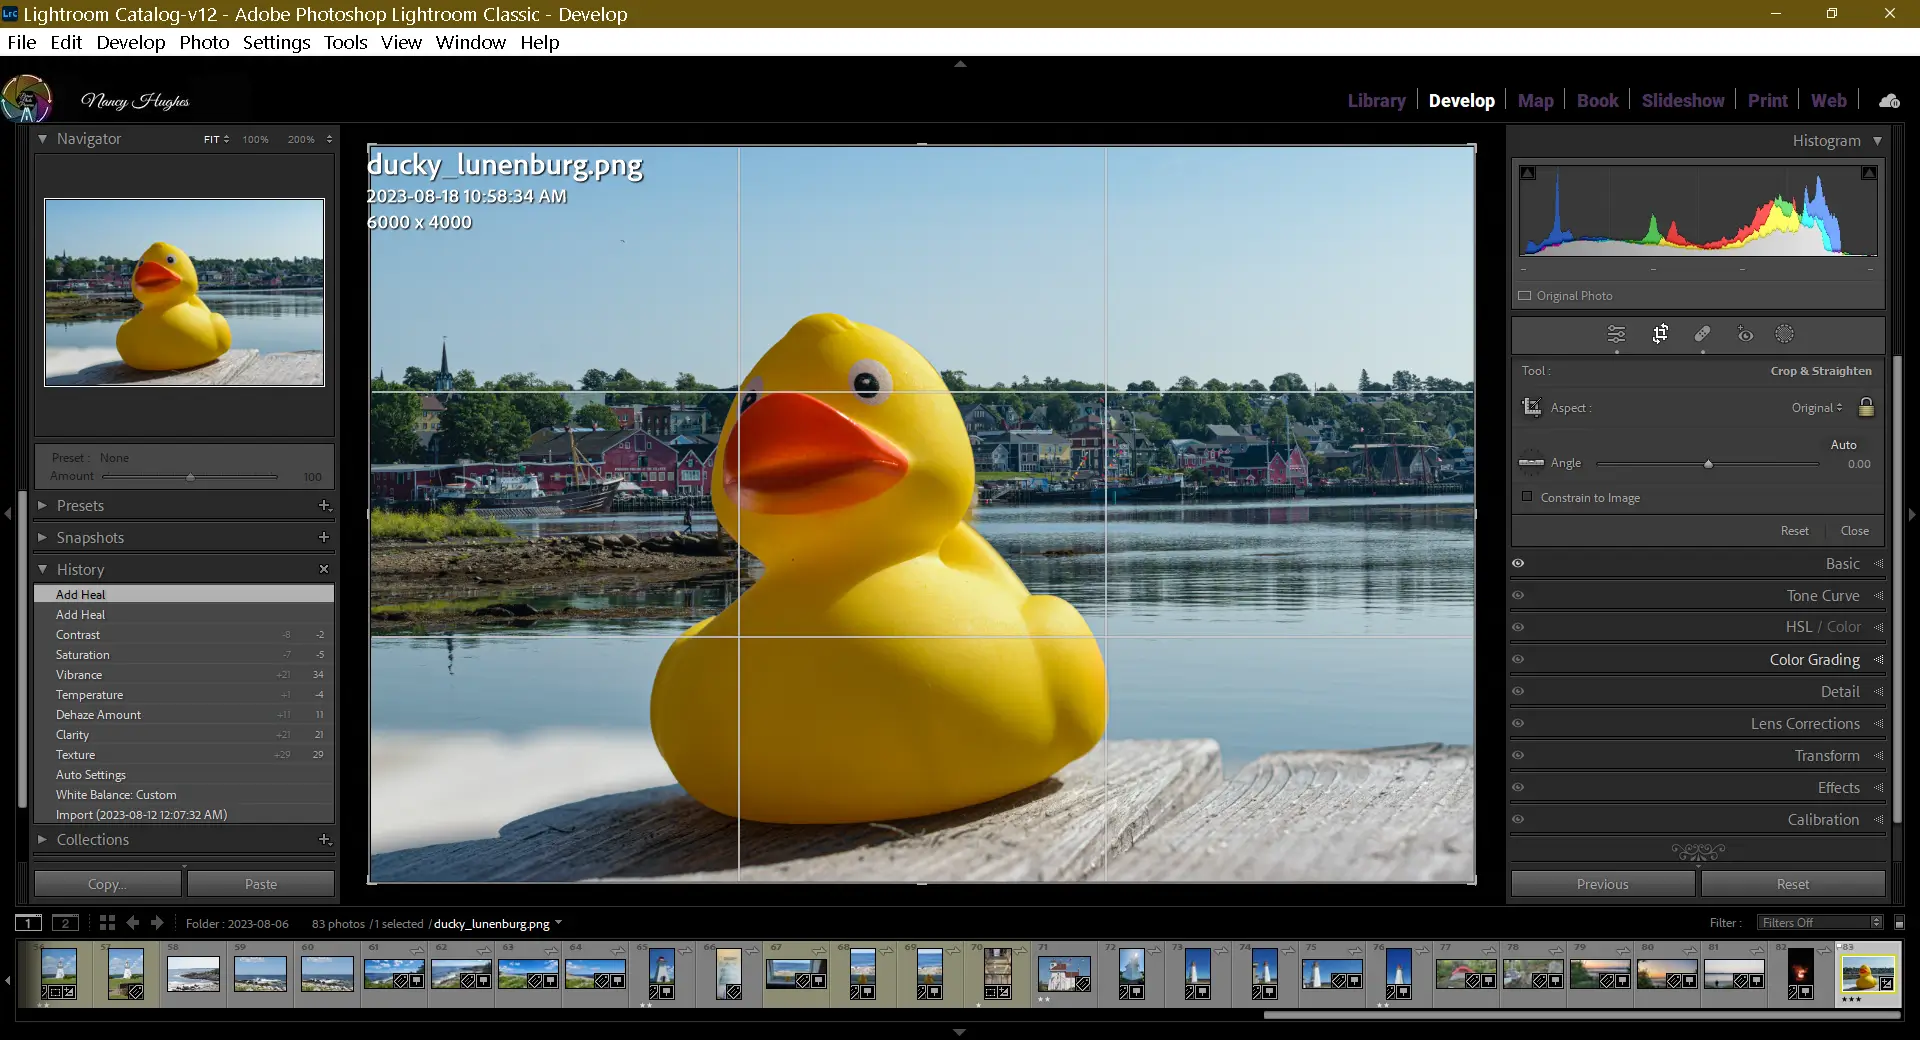
- Straighten Like a Pro: Press ‘r’ for the Crop & Straighten tool, and watch your photo transform. ensure horizons are perfectly straight. It’s like sculpting your photo’s composition for maximum impact. You can use “auto” or click the ruler next to the word “angle” and draw a straight line accross your horizon. Simple as that your photo dramtically improves.
- Crop for Use: Beside the lock there is a drop down and you will see numbers. Depending on the use of your photo or if you want to fix composition you will choose an aspect ratio. Common ones are 16:9 for landscape, 1:1 for instagram and 4:6 for printing. As long as you keep the lock in the lock position you can even crop further in and choose what part of the photo to keep while maintaining the aspect ratio.
- Presets to the Rescue: Feel like a shortcut? Dive into presets – these ready-made edits can give your image an instant makeover. The AI presets are advancing quickly and can control things like subject and background without needing to use advanced edits.
- Export Your Masterpiece: You’re almost there! Once you’re satisfied with your edits, it’s time to share your creation with the world. Go back to library module by hitting ‘g’ and choose which photos you want to save. You probably shot in RAW if you followed my suggestions in How to Take a Photo. This means you will need to change the file format to share withthe world. To do that hit the ‘Export’ button, choose your preferred file settings, and save your edited photo in a format that suits your needs – whether it’s for online sharing, printing, or preserving memories.
Remember, these sliders are your paintbrushes, and your photo is the canvas. As you adjust one, you might find the need to tweak others. It’s all part of the creative dance, rocking those sliders back and forth and finding your masterpiece. So, there you have it – a beginner’s guide to photo editing techniques. How cool is that? Of course if you want a sneak peak at advanced edits keep reading.
Advanced Photo Editing Techniques
Venturing into the realm of advanced photo editing techniques in Lightroom Classic opens up a world of possibilities. While these panels might be a bit like unlocking a treasure chest of creative tools, let’s give you a sneak peek into what each does:

3. Tone Curve Panel 
4. HSL Panel 
5. Colour Grading Panel 
6. Details Panel 
7. Lens Correction Panel 
8. Transform Panel 
9. Effects Panel 
10. Calibration Panel
- Masks: Delve into precise adjustments by painting over specific areas with brushes, gradients, or radial filters. It’s like being an artistic detective, focusing on the tiniest details.
- Healing: Banish unwanted blemishes or distractions from your photo with this tool. Think of it as your eraser for imperfections.
- Tone Curve: Sculpt the overall brightness and contrast of your image with even greater finesse. It’s like having a slider for crafting your photo’s mood.
- HSL/Color: Take command over individual colors’ hue, saturation, and luminance. It’s like having a magical wand to enhance or transform specific shades.
- Colour Grading: Think of the Color Grading panel in Lightroom Classic as your artistic palette, where you can delicately blend and harmonize colors to create a visual symphony in your photos.
- Detail: Dive into the finer details with sharpening and noise reduction, bringing out textures while keeping your image clean and crisp. This just got a new AI option in the last update 12.4, super exciting improvemnt.
- Lens Corrections: Correct distortions and aberrations caused by your camera’s lens, ensuring straight lines stay straight.
- Transform: Perfect perspective and geometry with options like leveling horizons or fixing distortion.
- Effects: Add vignettes, grain, or even split toning to infuse your image with unique style.
- Calibration: Fine-tune color tones at a foundational level, perfect for the ultimate color control.
Remember, these panels are like unlocking a treasure trove of creative options – beyond the scope of our intro, but the knowledge of their potential awaits you as you continue your journey of how to edit photos like a pro.
Embrace Your Inner Artist: Concluding Your Photo Editing Adventure:
In this captivating journey of discovering how to edit photos, we’ve delved into the essentials of crafting stunning visuals. From navigating the Basics panel to exploring the magic of presets, you’ve gained the foundation to transform your snapshots into captivating masterpieces.
But remember, dear explorer, this is just the beginning. Embrace the thrill of experimentation, for every slider, every brushstroke, holds the potential for an exciting discovery. As you tinker with advanced techniques like masks and healing, the true essence of your creative spirit will shine.
As you journey onward, let your unique style flourish. Just as no two sunsets are identical, your editing style is a reflection of your vision. So, go forth, dear creator, and paint your world with pixels. Your photographic odyssey has just begun.
Share your photo edits in the Facebook Community Page
If this helped you please share it with your friends. If you want more content delivered to you directly sign up for the newsletter and comment below if you have any questions or comments.
F.A.Q
How do I edit photos like a professional?
Mastering photo editing like a pro involves learning essential techniques, experimenting with advanced tools, and finding your unique style to create captivating visuals.
How do I edit my photos?
Editing your photos starts with selecting a photo editing software, like Lightroom Classic, and then using tools like exposure adjustments, color correction, cropping, and more to enhance your images.
How do you edit photos on iPhone photos?
On an iPhone, you can use the built-in Photos app to make edits like adjusting exposure, applying filters, cropping, and fine-tuning details.
Is there a free way to edit photos?
Yes, there are several free photo editing options available, including online tools like Pixlr, GIMP, or using the basic editing features in software like Google Photos or Apple’s Photos app.
Is photo editing important?
Absolutely, photo editing is crucial for enhancing the quality and visual appeal of your images. It allows you to correct imperfections, bring out details, and create a desired mood or style.
What are the best photo editing programs?
Some popular and powerful photo editing programs include Adobe Lightroom, Adobe Photoshop, Capture One, and Affinity Photo. The best choice depends on your needs and skill level.
How do you edit a photo perfectly?
Achieving a perfect edit involves a combination of adjusting exposure, color balance, sharpness, and more, while paying attention to details and maintaining a natural look.
How to edit photos on Android?
Android users can edit photos using apps like Google Photos, Snapseed, or Adobe Lightroom Mobile. These apps offer various tools for adjusting exposure, color, cropping, and more right on your Android device.